The Geographic Assessor (GA) allows users to import a list of areas for a single user-defined average (UDA) or import multiple UDAs from a single file.
To import one or more UDAs, first save your area list using one of these options:
1.Create a list of postal codes, cities, counties, states, or countries for a single user-defined average using a program like Microsoft Excel and save it as a .CSV (comma delimited) file. See instructions below.
2.Create a list of postal codes, cities, counties, or states associated with multiple UDAs using a program like Microsoft Excel and save it as a .CSV (comma delimited) file. See instructions below.
To Create a .CSV File for a Single UDA
1.Using a program like Microsoft Excel, create a list of areas. The list must have a separate column for postal code, city, county, and state.
2.A header row is required to identify the columns. The following headers can be used:
ZIP, Zip Code, Zipcode, Postal Code
City
County
State
Citystate
States can be listed in full or using abbreviations (e.g., Washington or WA) in the state column. Canadian provinces must be listed under state. The citystate column is designed to include both the city and state in this format: Seattle, Washington.
See Assessor Series FAQ #40 for suggestions on how to format ZIP codes correctly in Excel for export to an Assessor Series application.
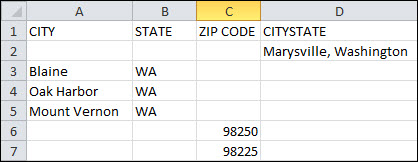
The following example displays one possible format for a .CSV file:

Any data that is not formatted correctly in the .CSV file will not be displayed in the user-defined average.
3.Once the table is complete, give the file a unique name (this will be the name of the UDA) and save the file in the .CSV (comma delimited) format.
4.Close the .CSV file.
To Create a .CSV File for Multiple UDAs
1.Using a program like Microsoft Excel, create a list of areas.
2.The list must have a separate column for postal code, city, county, and state. An additional column is needed for the various UDA names. (If you omit the UDA column, then all of the areas will import into a single UDA.)
3.A header row is required to identify the columns. The following headers can be used:
Zip, Zip Code, Zipcode, Postal Code
City
County
State
Citystate
UDA, UDA Name, UDA Names
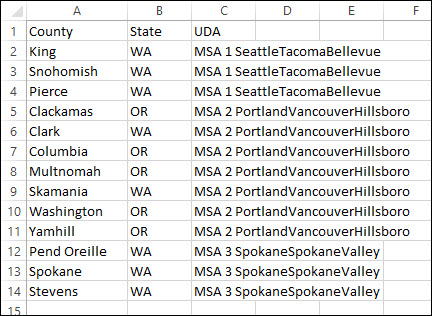
To import a list of counties, the .CSV file must have three separate columns for county, state, and UDA (the name of the user-defined average associated with the county).
The following example displays the correct format for a .CSV file containing multiple UDAs:

4.Once the table is complete, give the file a unique name and save the file in the .CSV (comma delimited) format.
5.Close the .CSV file.
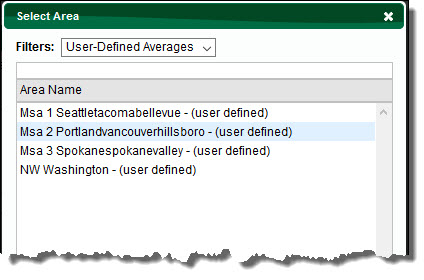
Note: If you are importing a list of multiple UDAs and have pre-existing UDAs stored in the Geographic Assessor, consider using a prefix in the UDA names in the .CSV file so that these new UDAs are listed together in the Select Area screen. In the example above, the UDA names include numeric prefixes (MSA 1, MSA 2, and MSA 3) so that they are sorted together in numeric order within the alphabetized UDA filter.
To Import a .CSV File
1.From the Two City Comparison table: Click the Base City or Destination City column header on the table.
| From the Comparison List - Labor or Comparison List - COL table: Click the Base City table header or a cell in the Comparison City column. |
| 2. | In the Select Area screen, click the User-Defined Average button at the bottom of the window. |
3.In the User Defined Averages screen, click the  (upload) button.
4.In the File Upload window, click the Browse button.
5.In the Choose File to Upload window, select the .CSV file to upload and then click Open.
6.In the File Upload window, click the OK button.
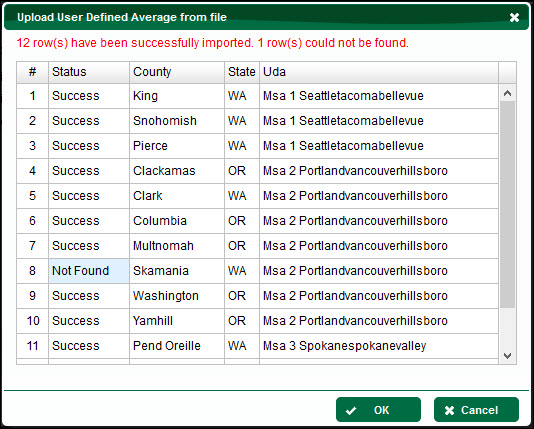
7.A message will display the number of rows that you have successfully imported. If the .CSV file contains any errors, then a message will display the number of errors encountered during the import and will list the areas needing review (see example below).
8.Click OK to return to the User Defined Averages screen.
9.All user-defined averages saved in the .CSV file will be uploaded at once, but they will be listed separately in the User Defined Averages screen.
The following screenshot displays the upload status for the example of a .CSV file containing multiple UDAs shown above. Notice that the status of Skamania County is "Not Found" because the Geographic Assessor database does not contain active cities with survey data in this rural county.

The following screenshot displays the new UDAs from the example above in the Select Area screen under the User-Defined Averages filter. Notice how the numeric prefixes in the UDA names allow us to sort the new UDAs easily.

To Create a User-Defined Average
See Create User-Defined Average
To Edit a User-Defined Average
To Select a Previously Defined User-Defined Average